Tears of the Kingdom: How to Unlock the Temple of Time
Before you can start the main part of your Tears of the Kingdom adventure, you'll need to unlock the Temple of Time. Here's how you do it.

It’s not a Zelda game without puzzles, and Tears of the Kingdom wastes no time putting you through your puzzle paces. Actually, one of the first things you’ll have to do in the game is find four Shrines that will allow you to enter the Temple of Time and escape the Great Sky Island tutorial area. Don’t let that “tutorial” description fool you. It’s surprisingly tricky to solve this part of the game when you’re first starting out.
So if you find yourself a little lost in the Great Sky Island, here’s a breakdown of how to find all four Shrines and continue your adventure.
Tears of the Kingdom: How to Unlock the Temple of Time and The Four Shrine Locations
To enter (and escape) the Temple of Time, you’ll need to complete four nearby shrines: Ukouh Shrine, In-Isa Shrine, Gutanbac Shrine, and Nachoya Shrine. The fourth shrine is actually closely connected to the Temple of Time (and is thematically a bit different), though you’ll need to beat it to get through that area.
Interestingly, it actually seems possible to tackle those shrines outside of their “intended” order. I know that I did just that the first time around. However, here is the recommended completion path:
Ukouh Shrine (First Shrine)
In-Isa Shrine (Second Shrine)
Gutanbac Shrine (Third Shrine)
Nachoya Shrine (Fourth Shrine)
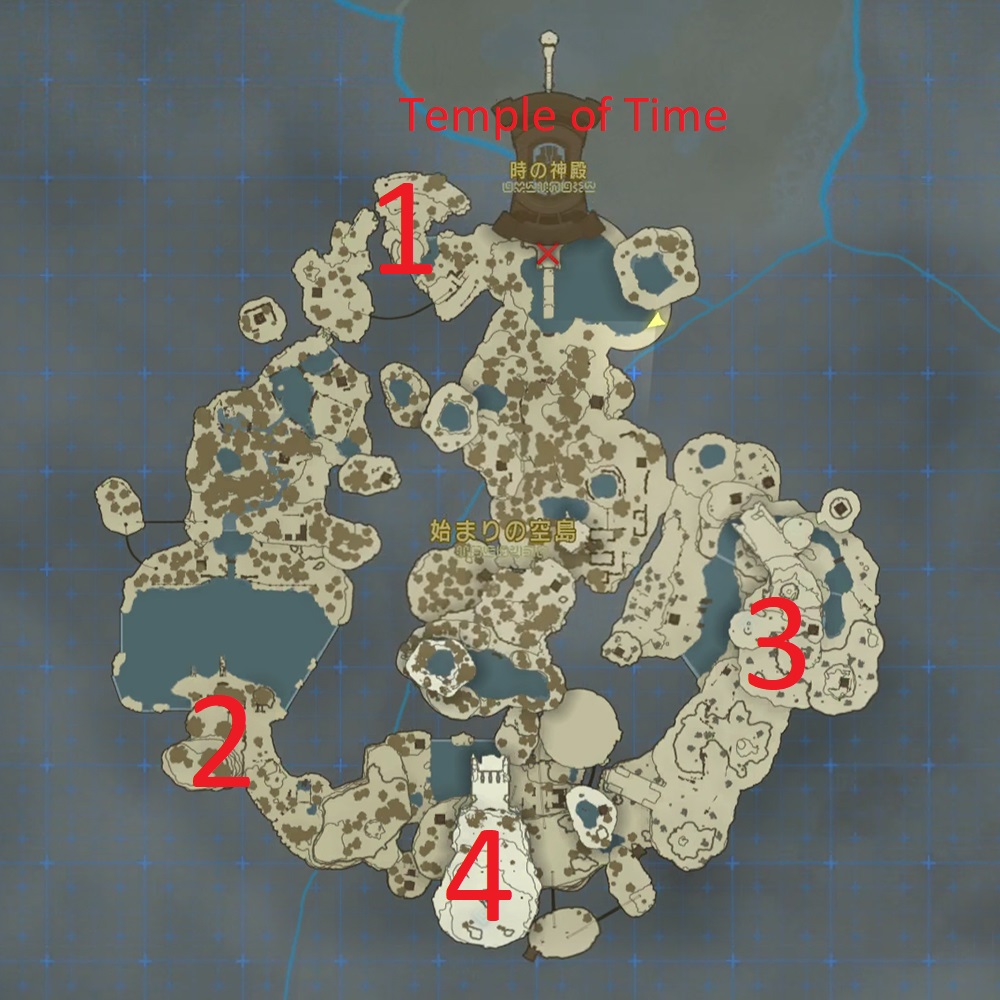
For reference, here is where you can find all of those shrines on the Great Sky Area of the map:
Tears of the Kingdom: Where to Find the First Shrine (Ukouh Shrine)
Head west from the locked door at the Temple of Time. Look for the nearby green glowing structure atop a cliff. That is the entrance to Ukouh Shrine. Thankfully, there is a path and a set of stairs that leads you to the Shrine’s general area. Once there, you’ll just need to climb to the Shrine’s entrance. Make sure you have enough stamina to make it.
Inside the Shrine, you’ll acquire the Ultrahand ability. This ability will allow you to combine certain items in the world. You’ll need it to solve the Shrine’s (pretty simple) puzzles and to reach the next Shrines on our list.
Speaking of which…
Tears of the Kingdom: Where to Find the Second Shrine (In-Isa Shrine)
Once you’ve existed Ukouh Shrine, head west and south. You’ll soon find a rail that crosses a nearby chasm. Using your new Ultrahand ability, attach a hook to a nearby plank and attach that device to the rail. You can then ride the rail to safety and the next area.
Soon, you’ll run into a broken bridge. You’re supposed to attach two logs together to cover the broken bridge, though you can do it with one log if you jump the rest of the way.
In any case, cross the bridge and head towards the lake. Once there, put three logs together to form a raft. You can then attach a sail to the top of that raft to cross the nearby lake. If you’re doing this out of order, you can also put a fan on the bottom of the raft and submarine your way to the other side. Either way, you’ll be able to cross the lake safely once your raft is complete.
On the other shore, you’ll find the entrance to the In-Isa Shrine. Here, you will learn the Fuse ability. This allows you to make custom weapons and similar items. Solve the nearby puzzles using that ability and exit the shrine.
Tears of the Kingdom: Where to Find the Third Shrine (Gutanbac Shrine)
This one is tricky.
After exiting the In-Isa Shrine, head east. Fight the enemies along the way if you’d like (they have good loot), but you’re really looking for a cave. Enter the cave, and follow the path. Again, there is really valuable loot in here, but none of it is necessary for this quest.
Eventually, you will run into a group of Maker Constructs. They’ll teach you a few new mechanics (and grant you access to powerful new items), but one NPC will give you a Zonai Capsule with a fan in it. From here, you’ll want to grab a nearby minecart, place it on the rail, and attach a fan to the back of the minecart. Hop inside the cart, smack the fan, and ride the rail to the next area.
From this area, you should be able to just spot the Gutanbac Shrine based on its relative position on the map I posted above. You may also notice that the Shrine is surrounded by snow. Just as in Breath of the Wild, trying to cross this area without the proper gear (which you don’t have) will cause you to freeze and lose your health.
Thankfully, there are numerous Spicy Peppers along this path. Pick up the peppers, cook them in one of the nearby pots, and you’ll create a dish that will grant you Cold Resistance. It’s better to combine as many peppers as possible in a single dish if you’re able to do so.
Once you have enough Spicy Pepper dishes, you have a few options about what to do next. I found it easiest to build a raft to cross the nearby lake. From there, follow the path up the mountain. Scale the nearby cliff wall, and you’ll reach an area with a waterfall in it. You’ll need to climb the cliffside in this area to reach the nearby shrine, but it’s covered in snow that will cause you to slip.
There are several ways to climb that wall, but I found it easiest to sneak right next to the waterfall. There, you will spot a slim part of the cliffside that isn’t covered in snow. You can climb that part of the cliff and reach the Gutanbac Shrine.
In that Shrine, you’ll acquire the Ascend ability, which lets you vertically pass through some objects. Once you solve the puzzles and exit the Shrine, look to the northeast. You should spot a giant “vending machine” atop a rock formation. Use Ascend to reach that machine, insert some Zonai devices, and take the materials that come out. What you’re really looking for is a fan, though you can acquire several resources from this machine.
Once you have a fan, drop down, and look for a bunch of Zonai Wings sitting near a rail. Attach a fan to one of the Wings, put a Wing on the rail, and ride the Wing to the next area. I believe you might be able to do this part without a fan, but it’s a little safer (and more fun) to have more control over the speed of the Wing.
Tears of the Kingdom: Where to Find the Fourth Shrine (Nachoya Shrine)
That Wing you just rode should lead you to the previously locked door at the Temple of Time. Enter that door and acquire the Recall ability. Go inside, rewind the platforms, and try to open the door at the other end. You won’t be able to, but Rauru will appear and give you the ability to fast travel between select points on the map.
From there, fast travel back to the Room of Awakening. Now that you have your core abilities, you can Ascend through the vertical platform in this room, Recall the nearby gears, cross those gears, and head through the nearby cavern. Through that cavern, you’ll find the entrance to Nachoya Shrine.
This Shrine is built around your Recall ability and is generally pretty simple. Just as before, you’ll receive a Blessing once you’ve reached the end of the Shrine. You should have four Blessings by this point.
With that fourth Blessing, you’ll be able to head to the Temple of Time, acquire a Heart Container, exit the starting area, and proceed to the main game. However, you will still be able to return to this area later if you need to do so.