How to Change NAT Type on PS4
Are you experiencing PS4 network problems? Here is a quick guide on how to change your PS4 NAT type and fix common errors.
 | |
| | 
Looking to change your PS4 NAT type? You’ve come to the right place.
If you’re having issues with your PS4 or PS4 Pro’s connection to PSN, suffering frequent disconnections or high ping rates, changing your Network Address Translation (NAT) type could help. You’ll know if you need to change your NAT type if your PS4 has trouble connecting to PSN and, under your internet settings, you see your NAT type listed as Strict or Moderate.
There are three main NAT types to be aware of:
• NAT Type 1 – Open
• NAT Type 2 – Moderate
• NAT Type 3 – Strict
You might think that an “Open,” or “Type 1” NAT is ideal, but it’s really not advised to set your router to it. It may eliminate unwanted disconnections, but it’ll leave your network type completely vulnerable. NAT Type 3 is a very strict connection type that enables additional firewall settings. The real NAT sweet spot is NAT Type 2, Moderate.
If you’re wondering how to move your PS4 NAT Type to NAT Type 2, our guide to changing your PS4 NAT type is here to help.
How To Find Your PS4 NAT Type
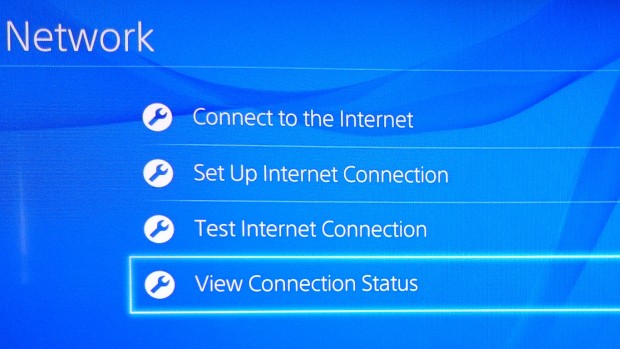
This part is simple enough. On your PS4 system go to Settings, then Network, then View Connection Status.
You should find your NAT type listed at the bottom of the page.
How To Change Your PS4 NAT Type
Changing your PS4 NAT type isn’t as straightforward as simply navigating through your PS4 and altering a couple of settings. It requires you to hook up to your router and fiddle with some settings in its admin panel. Because of this, it’s a little different from router to router, but we’ve detailed the most common way to find it below.
Step 1: Access your router’s admin panel via your web browser by entering in the address specified in your router’s instructions into a browser URL bar. On most routers, the default is usually 192.168.1.1. If this doesn’t work, it’s generally printed on a label on the base of your router or in your router’s user manual.
Step 2: Once connected, you’ll need to enter a username and password at this stage. Again, this may be printed on a label on your router, or in the manual.
Step 3: Now that you’re in your router, look for a setting that allows you to enable Universal Plug and Play (UPnP). You can generally find this under a section called “media.” If you don’t have a “media” section, have a look around as there will definitely be a UPnP setting you can modify.
Step 4: After UPnP has been switched on, there are two ways to go about changing NAT type. You can assign it to your network’s Demilitarized Zone (DMZ), if you have this enabled, but we don’t recommend you do this – it will leave your system completely open to security threats. Instead, you should forward specific ports to the PS4 console.
Step 5: This varies from manufacturer and model of your router, but there’s a good guide to Port Forwarding here. Those running a BT Home Hub 5 should follow these steps. You may also need to assign a static IP address to the PS4 depending on your router, but you’ll find clear instructions on how to do that in the guide above, too.
Step 6: Which ports should you open and forward? Sony advises the following port numbers, which are used for connecting your PS4 console to the PlayStation Network’s services:
TCP: 80, 443, 3478, 3479, 3480
UDP: 3478, 3479
Step 7: After forwarding the ports and rebooting your console, follow our instructions for identifying your NAT Type on your PS4 and you should discover you’re now running a NAT Type 2 connection. There may also be extra ports that need to be forwarded for specific games. For those, you should refer to the online support pages for the game in question.
How To Fix NAT Type Failed Error
NAT failure errors most commonly occur when you’re playing and chatting with others. As you can imagine, that can be quite annoying.
The bad news is that there is no universal fix for this issue. The good news is that there are quite a few things you can try that may eventually fix this problem. Just be sure to follow these suggestions in order:
Restart Your PS4/Network Connection
This is the most common fix to this particular problem as it can cleanse whatever corruption is forcing this error to appear in the first place. On that same note, you should probably try resetting your router and modem as this error can also stem from a simple connection problem. If that doesn’t work, then you’ll need to move on to the following steps.
Manually Set Your PS4 Network Connection
Step 1: You may need to manually configure your PS4 network settings. To start, open the Settings menu of your PS4 and choose the Network option. On the next menu, choose View Connection Status. From there, make note of your IP Address and write it down if you need to. You’ll need it for the next steps.
Step 2: On a Windows desktop or laptop, hit the Windows logo key + R and type CMD into the dialog box that opens.
Step 3: Type ipconfig/all into the Command Prompt menu. This should bring up several pieces of connection information, but what you need to write down are the IP Address, default gateway, DNS server, and subnet mask.
Step 4: Go back to your PS4 and open Settings. From there, navigate to Network and Set Up Internet Connection.
Step 5: Choose the type of internet connection that you’re using (WiFi or LAN Cable/Ethernet).
Step 6: Select Custom on the following menu. You will then be prompted to enter all of the network information you got from your PC.
Step 7: Choose “Do Not Use” as your Proxy Server setting. You’ll then need to wait for your selections to process. Once that happens, be sure to choose the Test Internet Connection option to make sure that you’re properly connected to the internet.


Set Up Port Forwarding for Your PS4
If the above steps don’t fix the problem, you may have to dive into your wireless router and set a forward port for your PS4. We mentioned these steps in the section above, but here’s a more detailed breakdown of the process:
Step 1: Grab the IP Address, Username, and Password for your wireless router. The methods of accessing this information may vary based on your model, but you should be able to access it via a web browser or just by looking at the back of your router (if all of that information is set to the default).
Step 2: Enter your IP Address into a web browser. You should then be able to manually log-in to your router.
Step 3: You should then see a command related to port forwarding. This section will usually include some variation of the words “port” and “forwarding,” but you may need to check your router’s instructions if you don’t see an obvious variation.
Step 4: You’ll then need to add some custom forwarding ports. This can be a bit tricky, but as we said above, some of the recommended ports are 80(TCP), 443(TCP), 3478(TCP and UDP), 3479(TCP and UDP), and 3480(TCP). You’ll then need to register your PS4 IP address to each of these ports. You can consult the guide above for where to find that information if you don’t already have it. Save your changes once you’ve added this information.
Step 5: Go back to your PS4 and open Settings. From there, navigate to Network and Test Internet Connection to see if everything is working properly. Of course, the best way to test this is to try playing a game and see if the error is corrected.
It should also be noted that, if this doesn’t work, you can try enabling Universal Plug and Play (UPnP) on your router. You can find instructions on how to do that in the “How To Change Your PS4 NAT Type” section of this guide.
You can also enable the DMZ setting as we advised you not to do in that same section. Again, there are serious risks associated with this method that you may not want to make yourself vulnerable to.
Are these solutions not working for you? Let us know in the comments!