Call of Duty Warzone 2: The Best Drop Spots On the New Map
Warzone 2's new map is still being "solved," but here are a few of the best early drop points in the game.

Activision Blizzard is currently under investigation following accusations of harassment, discrimination, and fostering a hostile work environment. You can read more about the investigation here.
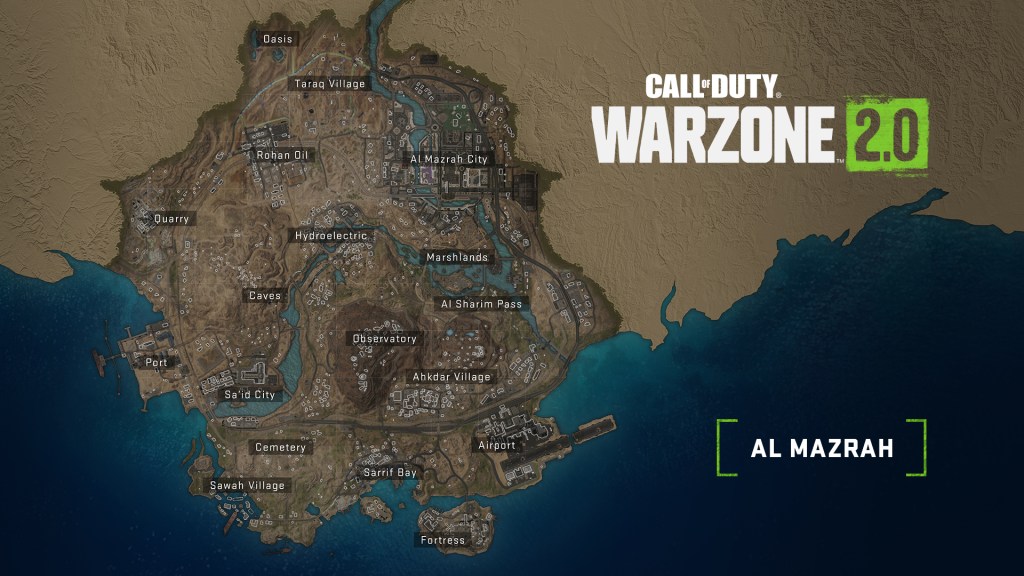
Warzone 2 is finally here, which means that battle royale players will soon be dropping into the game’s new map, Al Mazrah, for the first time. That also means that those players will be looking for the map’s best new drop spots.
As is usually the case with battle royale games, finding the best drop points in Warzone 2 depends on your preferences, situation, and timing. If, for instance, you find yourself flying into the northern part of the map, it may not be worth it to wait for an ideal drop point all the way to the south.
That’s why I’m including a series of optimal drop points spread across the bulk of the Warzone 2 map. So wherever you may happen to fly into, here are the drop points that will hopefully help you secure that elusive Warzone 2 victory.
The Quarry
Essentially a modified version of the fan-favorite Call of Duty map of the same name, The Quarry offers one of Warzone 2‘s most intriguing landing spots.
The Quarry is located near an out-of-bounds zone, which instantly gives you one less area to watch out for. It’s also positioned between two other popular drop points, which means you might get lucky and watch all the other players go for those points and leave Quarry untouched.
Even in a gunfight scenario, Quarry offers distinct high-ground advantages as well as opportunities for quick, close-range fights. It’s not necessarily the best loot spot, but it’s a fantastic tactical position that offers a number of rotation and defensive options.
North Side of Al Mazrah City
Obviously, the massive Al Mazrah City is filled with loot. However, it will also be filled with players willing to risk it all in search of that loot. That means that most drops directly into Al Mazrah City will either quickly end your game or give you the cash and gear required to win the match shortly thereafter.
To minimize the risk of this high-risk drop, consider jumping into the north side of the city just outside of the main metro area. The buildings in that location are not only filled with loot but allow you to safely put your back towards an out-of-bounds area.
You may have to deal with any rotating squads from the nearby Taraq Village, but the goal is to get what gear you can and pick off the survivors of the Al Mazrah City fight. With a little loot luck, you should be cruising from there.
Sawah Village
The best and worst thing about Sawah Village is the fact that it’s so far out of the way. Usually, that would make it the kind of “safe, but unspectacular” battle royale drop point best left to those looking to live as long as possible rather than hunt other players.
However, Sawah Village benefits from a couple of sneaky advantages. First off, it contains by far the most loot you’ll find in that area of the map. Second, it affords you plenty of room to rotate towards more congested drop points as soon as the fighting at those locations is finished.
Until you’re able to rotate, you’ll also be able to take advantage of the fact that the Village is surrounded by natural defensive structures and is typically not that congested. It’s also located near a Stronghold spawn point, which is obviously a huge perk for the right squad.
Sarrif Bay
Again, Sarrif Bay initially looks less appealing than some of the alternate drop points in its immediate vicinity. However, the Bay is a much better drop point than you probably think.
Not only does the Bay offer ideal ways to roll out to the Aiport or the Fortress (two very popular drop points and loot spots), but you’ll even be able to take advantage of the high ground when approaching those areas. There’s also a surprising amount of loot in this general area that becomes even more valuable if you’re one of the few squads to choose this spot as your drop point.
While the location of this position means that it puts you at notable risk of suddenly finding yourself surrounded if the circles don’t break quite the right way, it still offers a nice little middle-ground between “safe” and “lucrative.”
Observatory
To be very clear, the Observatory is not for the weak of heart. Between its treasure trove of loot and its location somewhere near the dead center of the map, it’s as high-risk as a high-risk drop point gets.
The reason I’m highlighting this drop point over its high-risk alternatives is the simple fact that securing the Observator offers the best chance of winning the rest of the game. That’s because the Observatory offers some of the best high-ground advantages in Warzone 2. It’s almost impossible to properly sneak up on a squad that secures this spot early.
So, unless you want to avoid high-risk drops altogether (or the circles break in an incredibly unfriendly way) consider dropping into the Observatory and rolling the dice on a massive advantage.
Taraq Village
The northern part of the Warzone 2 map doesn’t offer a ton of tactical advantages, but Taraq Village would likely still be the area’s absolute best drop point even if there was more competition for that category.
Unlike nearby Rohan Oil, Taraq Village offers a nice open space that allows you to utilize several positional strategies based on what early loot you get. As mentioned above, the Village also offers some of the only substantial loot in the immediate area. Again, it’s pretty much your only real choice if you’re looking to (or are forced to0 land in that region.
For what it’s worth, the Village also allows you to easily transition into several hot spots as soon as it feels safe to do so. The perimeter of this location even offers a nice high-ground view of Al Mazrah City, which is perfect for those who find a sniper rifle and want to start picking at stragglers.
Outside of Al Sharim Pass
The entire area around Ahkdar Village tends to be a hot zone of death and rapidly diminishing loot. If you have to land in that region, your best bet is to land in the small “suburbs” area to the east of Al Sharim Pass.
This small collection of buildings near the out-of-bounds zone is a much better drop point than it initially appears to be. It’s not only one of the safest spots in the area, but it offers an array of loot as well as some nice high-ground locations that allow you to either defend your position or scout the next area.
Honestly, I could see this becoming a sneakily good starting point for the majority of players. Unless the zones break in a way that forces you to awkwardly pivot to dangerous areas, you should be able to use this location as an excellent starting point for many successful pushes.