Diablo Immortal: How to Summon the Fleshcraft Hydra and Sandstone Golem
Can't find the Fleshcraft Hydra and Sandstone Golem? Here's what you need to know about two of Diablo Immortal's world bosses.

Activision Blizzard is currently under investigation following accusations of harassment, discrimination, and fostering a hostile work environment. You can read more about the investigation here.
Diablo Immortal isn’t just a mobile game with questionable microtransactions; it’s the first Diablo game that tries to incorporate more traditional MMO elements. Few of those classic MMO concepts fit the Diablo series better than the addition of world bosses like the Fleshcraft Hydra and Sandstone Golem.
As is the case with many MMOs, Diablo Immortal‘s world bosses are not easy to beat or even challenge. They’re designed to offer epic encounters that require a group effort to overcome, and that’s exactly what they provide. Interestingly, though, half the battle against Diablo Immortal‘s world bosses typically involves figuring out how to summon them in the first place.
That being the case, here’s what you need to know about summoning, finding, and fighting two of Diablo Immortal‘s most elusive world bosses.
Diablo Immortal: How to Summon and Find the Fleshcraft Hydra and Sandstone Golem
Like so many other things in Diablo Immortal, summoning either the Fleshcraft Hydra or Sandstone Golem requires a bit of luck. However, here’s how the basic process works.
- Head to the Library of Zoltun Kulle.
- Look for the “Lost Pages” spread throughout the library. The locations of the pages are randomized, but they always look like stacks of paper.
- Once you’ve collected five Lost Pages, you’ll be able to create a Portal Tome.
Here’s where things get tricky. When you use a Portal Tome, there’s a small chance that you’ll summon the Fleshcraft Hydra world boss or the Sandstone Golem world boss. However, there is also a chance that you’ll simply open a portal to small dungeons known as Kulle’s Hidden Chambers. While the loot in those dungeons can actually be quite valuable, it’s understandable that most players want to summon a world boss when they use a Portal Tome.
So far as we can tell, it seems to be much more likely that you’ll open a portal when you use a Portal Tome rather than actually summoning one of those world bosses. The good news is that all world boss summons are a global event. So, if you or another player in that same area manages to summon one of the bosses, everyone in that area will receive a notification that a summon has just been triggered. You’ll even see a timer pop-up that will tell you how much time you have to reach the summoning site (you’ll usually have about two minutes from the time the summon is initially triggered).
Where are those summoning sites? Funny you should ask…
Diablo Immortal: Where to Find the Fleshcraft Hydra and Sandstone Golem
While the Fleshcraft Hydra and Sandstone Golem are randomly summoned via the same method, they actually spawn in two unique spots. Given that you may have a limited amount of time to reach those bosses when they are summoned, you’ll want to start heading in the right direction right away in order to make it to the fight on time.
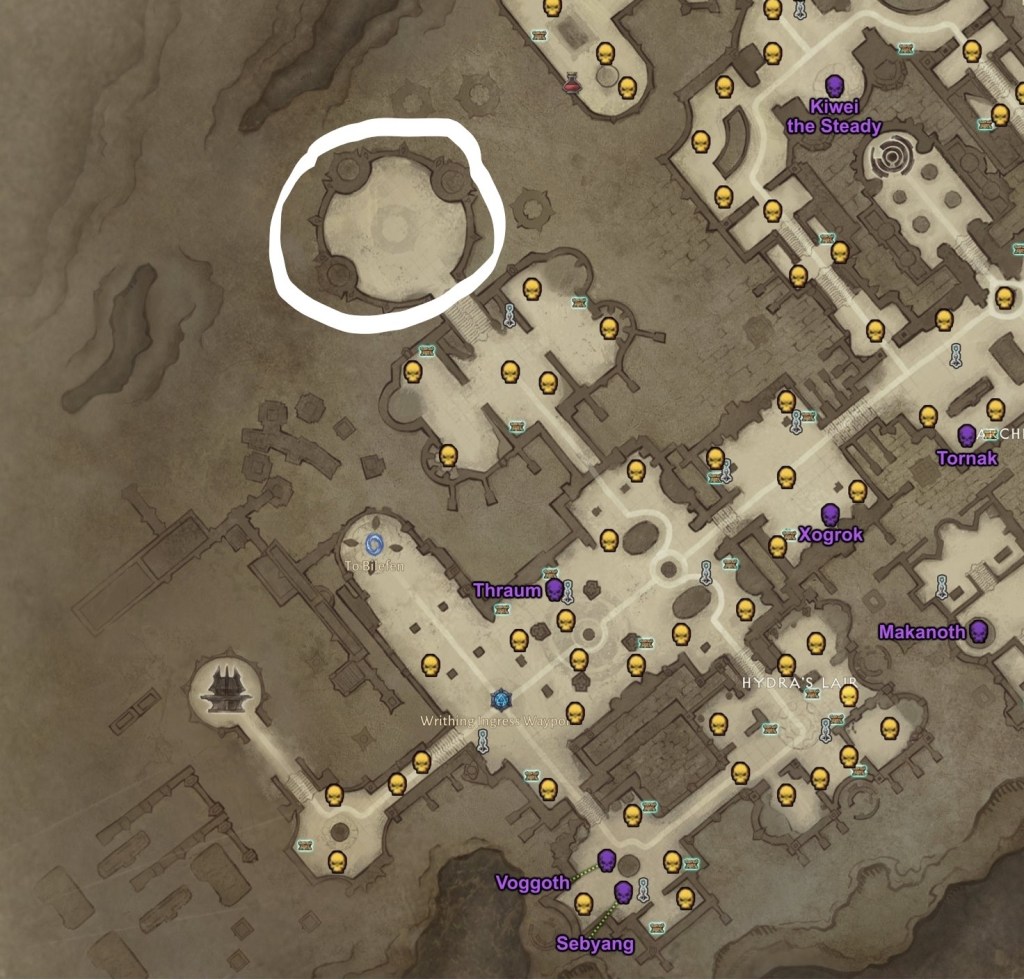
If you see that the Fleshcraft Hydra has been summoned, you’ll want to head to the western portion of the library area. Specifically, you’re looking for a chamber that is located near the Writhing Ingress waypoint. The chamber is located to the northwest of that waypoint. Here’s exactly where you’ll find it (map courtesy of Wowhead):
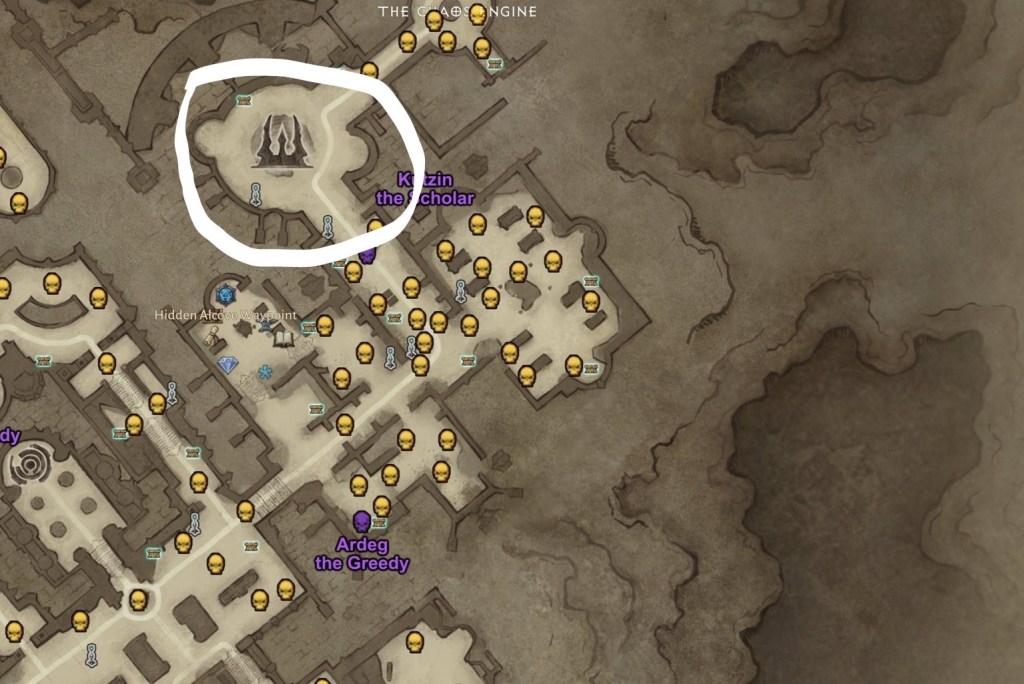
The Sandstone Golem is a little trickier to find. The easiest way to locate its summoning spot is to head south from the Hidden Alcove waypoint and proceed through the area located directly to the east. Here’s where you’ll eventually find that boss:
Now that you’ve actually found those bosses, it’s time to fight them. That’s where the fun really begins.
Diablo Immortal: What Rewards Do You Get For Beating the Fleshcraft Hydra and Sandstone Golem?
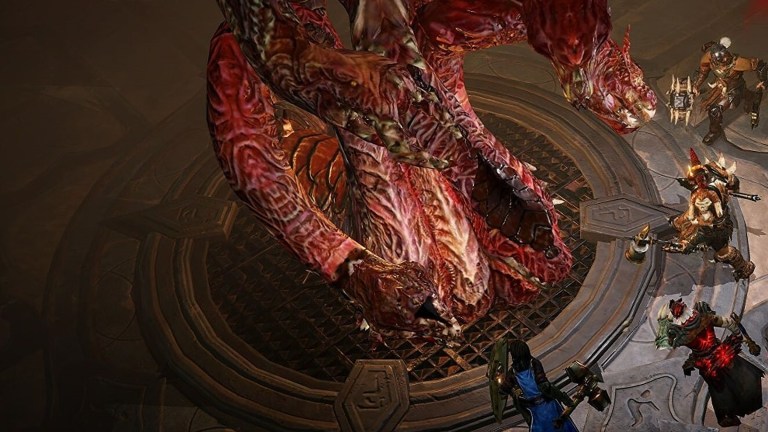
This shouldn’t come as a surprise, but the Fleshcraft Hydra and Sandstone Golem are both pretty tough. They have massive health pools, and if you don’t have enough people alongside you working together to take them down, they will almost certainly ruin your day.
That said, the fights against them are pretty straightforward. Like most of the other enemies in Diablo Immortal, you just need to stay out of the way of their indicated attacks and try to sneak in as much damage as you can all the while. As long as you have enough high-level players fighting alongside you to eat and dish damage, those bosses will eventually go down.
Unfortunately, we don’t really know what these world bosses’ loot tables look like. You’d think that you’d get a ton of legendary gear or some other unique drops for taking down one of those creatures, but players have shared wildly different loot reports. Some say they were greeted by a shower of rare items, while others indicate that they only received a few Experience Orbs (which seem to be the only guaranteed drop from both bosses). It seems you can earn some incredibly rare Legacy of The Horadrim Vessels from those bosses if you’re at the stage of the game where those items are eligible to drop, but neither boss seems to offer any other unique drops.
What matters most, though, is the fact that those bosses seem to be one of the more reliable sources for Enchanted Dust in the game. While it’s not easy to grind bosses that are randomly summoned, those who have tried to camp these bosses report that they tend to drop more Enchanted Dust than other enemies in the game. Given that Enchanted Dust is a relatively rare item that allows you to upgrade your Legendary gear, the possibility of acquiring more of it with some consistency is all the incentive you should need to try to take down a world boss or two from time to time.